[GUIDE] How to Remove The Copyright From Free Blogger/Blogspot Templates
February 02, 2021

How to Remove the Designed/Created by Copyright Mark From A Free Blogger Template - Whenever we write a new blog, we get set with default blogger templates which are quite unattractive. Even though Blogger.com has updated its list of default templates for us to choose from, many of us prefer to use our own templates or those provided by free and paid template giving sites.
Some people think that the paid templates given are either too expensive, do not find it necessary to buy them, or prefer the free copyrighted versions.
But personally, whatever reason we might have not to buy a paid blogger template, we all have that little desire to remove that thing we didn't pay to remove.
So, today I will show you guys how to remove copyright marks, and then I am sure that you will be able to call your template completely yours.
The Main IssueLeading template distributor sites like Templateify, Templateism, Goyabi, etc. distribute templates with both free and paid versions. If we buy the paid templates we get many features like support, installation, extra customization, and most importantly, user license, which means that they give a copyright-free template which we can take advantage of in any way. But, if we don't buy it and instead take it as a freebie, we don't get those features, nor a copyright-free template. That is why today I am going to show you 3 easy ways to remove/hide copyright marks.
Method 1 - CreativityYesterday, I was trying to remove copyrights from Bloggertheme9 templates using method 2 which you will read about ahead. But sadly, for some reason, I was unable to remove the copyrights from its template, so instead, I decided to apply a bit of creativity. This way, we are not removing the copyrights, nor breaking the rules. We just have to change a bit of the CSS in a creative manner. See how-
1. Open your blog and locate the copyrighted area on your page.

2. In a separate tab, open your Blog dashboard > Theme > Template Html Editor.
3. Locate the copyrights in the HTML by using whatever word that is in your copyright-like copyright, designed by, etc..

4. In the entire line of copyrights, locate the class-name it belongs to. Like in the above picture, the class-name is 'attribution'. Copy that class-name and search for its CSS again by clicking Ctrl+F.

5. When you find the CSS, change the tag values like mentioned in the picture. For example, if in the CSS, there is a font-size tag, then change its value to something like 0.1px. Do not go for 0 because it might redirect your blog to the designer's site.
6. After making the alterations, click Save
7. As you can see, you will get a result like this.

This method was quite satisfying for me. I had not read about this anywhere. I got this idea when I was trying to remove the copyright by method 2. But remembering method 4 (removing javascript) helped me come off with this. This way, the copyright will no longer be visible at all, you can separately write any copyright of your own that you might want to remain visible, plus since you still have it on your site, you are not breaking any rules, nor will there be any redirects.
Method 2 - Adding CSSThis method is quite common and is also very easy. It works most of the time because most template distributors don't think of a way out of this trick. Unless they do, you can always use one of our other methods. But let me show you what you have to do.-
1. Open your blog and locate the copyrighted area on your page.

2. In a separate tab, open your Blog dashboard > Theme > Template Html Editor.
3. Locate the copyrights in the HTML by using whatever word that is in you copyright like copyright, designed by, etc..

4. Add this style tag to the HTML
style='visibility: hidden'
You will have to add this line of code to the HTML like this -
<div class='copyright'> - to - <div class='copyright' style='visibility: hidden'>
Though the class-name (in red) in your HTML template might be named differently.
5. After adding the line of the script, click Save.
6. The copyright will be hidden and you are done.
Method 3 - Removing JavaScriptFor those who don't have much knowledge about coding and JavaScript, this could be a bit tricky. Different sites have different styles and methods of coding their templates. If you want to remove the copyright from sites, here are some different things you can do.
1. Open your Blog dashboard > Theme > Template Html Editor.
2. In the entire XML., search for the following CDATA
//<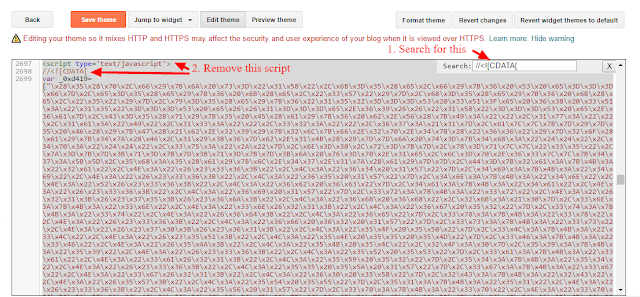
3. Once you find the code that looks something like in the picture given above, delete the entire script.
4. Locate the copyright in the XML. You can now fearlessly remove all of the copyrights or edit it as much as you want or maybe even delete some and keep some.

5. Once you are satisfied with what you have accomplished, click Save, and view your un-copyrighted site
Those are the three best methods I have knowledge of for removing copyrights from blogger templates.
Important Notes
If you are lucky enough to have a template without copyrights including ids like id=my-content or something, then you do not have to do any of this and can simply just change the text.
Try not to remove copyrights because many designers work hard and deserve to be recognized.
If not at the footer, you can always keep your essential copyrights and place them at other places on your blog/templates.
I really hope that this post helped you with what you were looking for, come back later to check out more awesome posts and tutorials.
Further tips:
I've had templates where all of the above only got me so far. This part is to show you how sometimes you need to get a little more creative. I had one recently where the copyright disappeared nicely using a combination of the above techniques. I got rid of all the CDATA and low and behold all the images went with it.
There was an extra bit of code written in to maliciously remove thumbnails when the CDATA was removed.
So this template actually relied on SOME CDATA being there.
Through trial an error removing parts of the CDATA I noticed that part of the CDATA was actually built to control the thumbnails. It was changing the url of thumbs to something broken and then noticed the trigger was "jQuery". I deleted just the 'jQuery' section of CDATA above and it worked because it no longer had the trigger.


Comments
Post a Comment